Promote the Server to a Domain Controller

Full-Access Members Only
Sorry, this lesson is only available to Server Academy Full-Access members. Become a Full-Access member now and get instant access to this and many more premium courses. Click the button below and get instant access now.
Instructions
Q&A (0)
Notes (0)
Resources (0)

Saving Progress...
Resources
There are no resources for this lesson.
Notes can be saved and accessed anywhere in the course. They also double as bookmarks so you can quickly review important lesson material.
In this lesson we are going to promote SADC01 to a domain controller.
Promote this server to a Domain controller
Step 1. Open Server Manager
Open Server Manager by clicking the Windows button and clicking Server Manager or by searching for Server Manager.
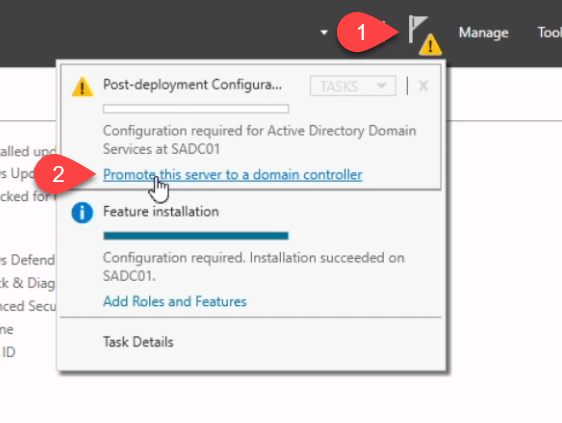
Step 2. Launch DC promotion wizard from Notification Flag
Select the notification flag, then Promote this server to a domain controller:
Step 3. Select the Deployment Operation
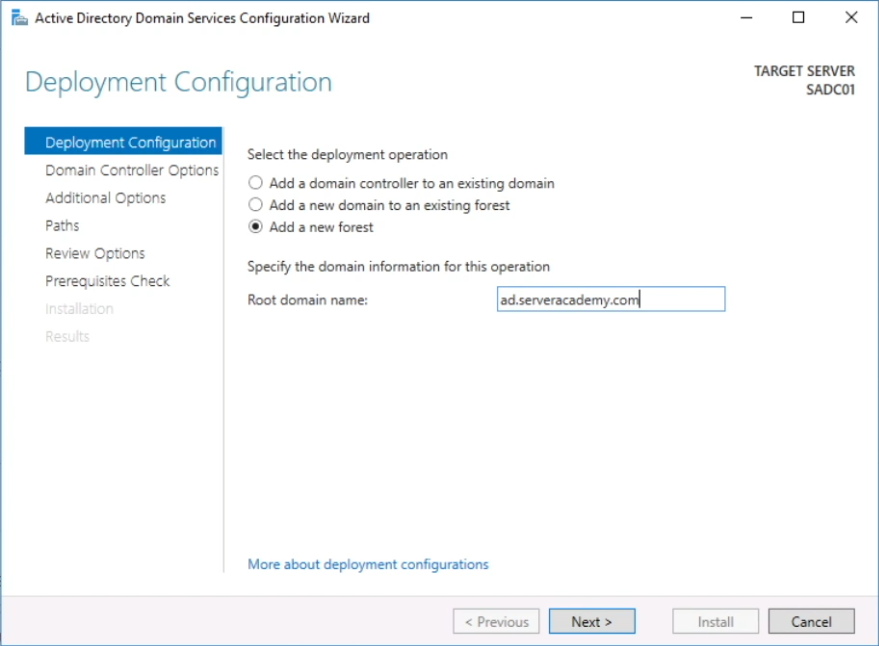
The next screen will ask you to specify if you want to join an existing domain, add a new domain to an existing forest or add a new forest. Since we are installing the first domain controller in our network, we will need to choose the last option.
Click Add a new forest. Enter your desired domain name (mine will be ad.serveracademy.com) and click Next:
Step 4. Configure Domain Controller Options
Domain and Forest Functional Level
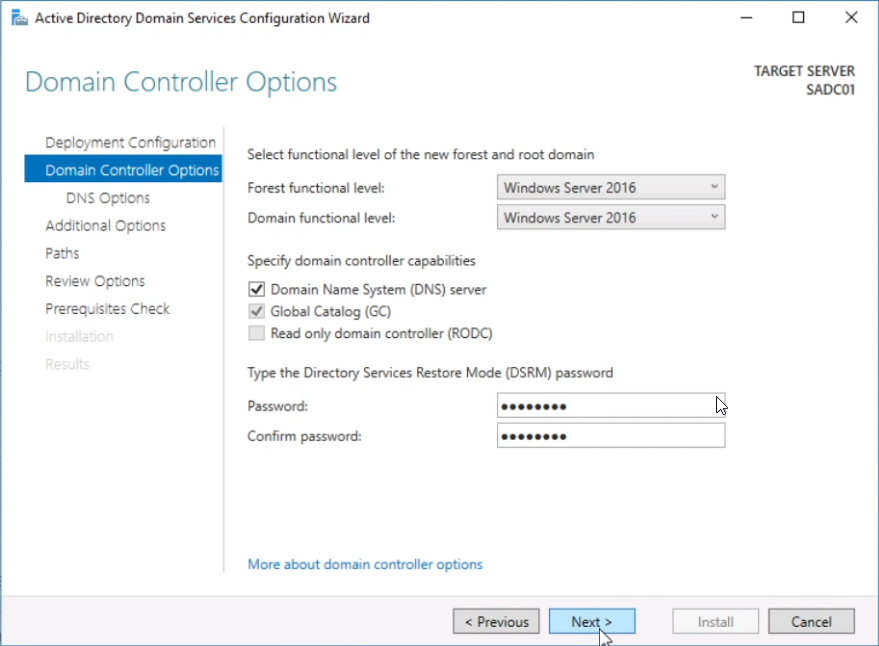
Select the desired forest and domain functional level. The default options will work fine in our scenario.
If this is a new domain you should select the highest available option. You should only choose older options if you have older domain controllers in your domain or forest.
Specify Domain Controller Capabilities
The default opens for your first domain controller are DNS and GC (Global Catalog). This are required for the first domain controller installation in your domain unless you have a separate DNS server installed.
We do not, so we are going to go with those settings.
Specify the Directory Services Restore Mode (DSRM) password
The DSRM password is used when you launch the domain controller into DSRM mode. One example of when you will do this is when you need to restore a system state backup of the server.
For my lab environments I always use the same passwords so I am going to enter that here. You should use a secure password that you save somewhere in case of a critical failure of your server.
Click Next:
Step 5. Configure the DNS Options
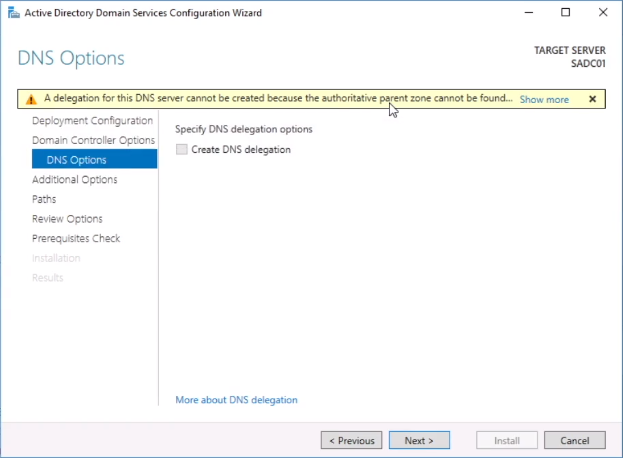
On the DNS options page you will most likely see a warning for DNS Delegation not being created. This error means that the server cannot create a DNS delegation for the DNS zone “above you”.
In our case, it’s trying to create a DNS delegation in serveracademy.com for ad.serveracademy.com. The DNS for serveracademy.com is handled by CloudFlare, a non-windows DNS server that my server has no permissions for.
This is why we see this warning message. We can safely ignore it because we don’t need the public DNS to work with our local active directory domain.
Click Next:
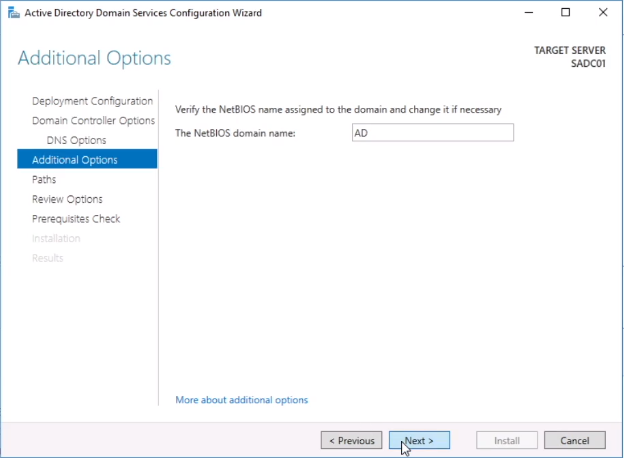
Step 6. Additional Options
This page simply shows the NetBIOS domain name. This is a 16-byte name that is a more friendlier way of identifying the domain and computers on the domain than the FQDN (fully qualified domain name, ad.serveracademy.com).
No changes are needed, so click Next:
Step 7. Paths
The next screen allows you to modify the Paths for your domain controller. I will briefly explain what each folder is:
Database Folder
This is where your Active Directory database (ntds.dit) is stored.
Log files Folder
Just like it sounds - your Active Directory logs will also be stored here.
Sysvol Folder
This is a repository for your active directory files like Group Policy files, domain security info, logon scripts and more. When you have multiple domain controllers, this is the folder that replicates your active directory data between your DCs.
You don’t need to modify any of these settings unless you prefer to place them on separate disks for performance. In our lab environment this is not needed. Click Next:

Server Academy Members Only
Sorry, this lesson is only available to Server Academy Full Access members. Become a Full-Access Member now and you’ll get instant access to all of our courses.


After promotion, I don’t see the rest of the AD except for AD module for Windows Powershell.
Please advise? Thanks.
I forgot to mention that I’ve installed it on my virtual machine.
Hi Albert Casupang
Which version of Windows Server did you install? If you installed Active Directory you should see the Active Directory Users and Computers and DNS tools under the menu. Also, you should see AD DS and DNS from the left-hand side of the Server Manager windows.
Ricardo
I installed the 2016 version.
“Also, you should see AD DS and DNS from the left-hand side of the Server Manager windows.”
I can see these on the left-hand side.
Except for the issue I am having.
I’ll try again and let you know. Thanks for your reply.
It is weird then that having those on the left side doesn’t show you the options under the Tool section.
Let us know how it goes.
This time, it went well. All the AD options under tool section are now showing, Nice!!