Console Overview Part 1

Full-Access Members Only
Sorry, this lesson is only available to Server Academy Full-Access members. Become a Full-Access member now and get instant access to this and many more premium courses. Click the button below and get instant access now.
Instructions
Q&A (0)
Notes (0)
Resources (0)

Saving Progress...
Resources
There are no resources for this lesson.
Notes can be saved and accessed anywhere in the course. They also double as bookmarks so you can quickly review important lesson material.
Welcome to part 1 of the System Center Configuration Manager Console Overview. In this lecture you will gain a basic understanding of the components and structure of the CM Console.
From the SCCM Server let’s launch the console. I’ll go ahead and Click the Search icon, and type console, Then click Configuration Manager Console
Let’s start with the major components of the console
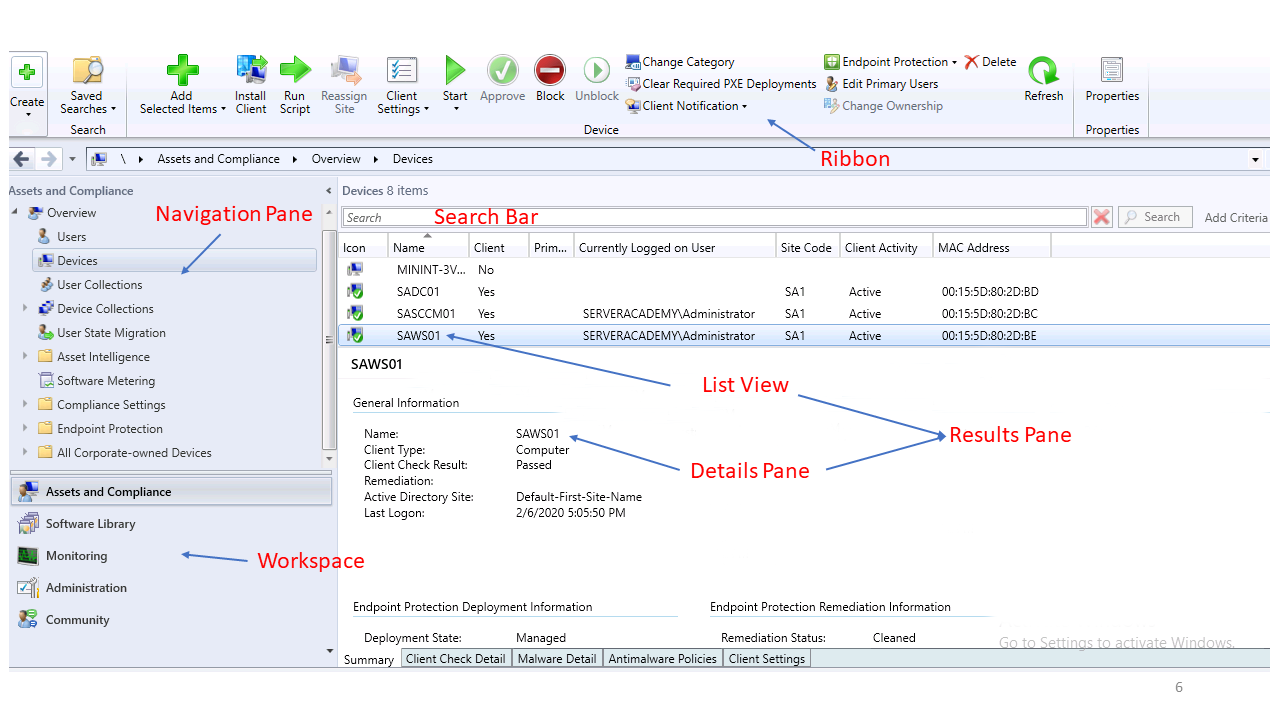
- First, we have the Workspace, the Navigation Pane and if we click Overview we have the Results Pane.
- An easy way to navigate through the Console is by clicking Overview in the Navigation Pane and clicking through the five selections in the WorkSpace.
Notice that as we click each Workspace, in the Results Pane each node has a brief description of its function.
- The Navigation Pane – Sometimes called the WunderBar, displays the nodes depending upon which Workspace that is selected.
- The Workspace, consists of Assets and Compliance, Software Library, Monitoring, Administration and Community
- If I highlight each selection in the workspace notice that there is a helpful description of the function of each component.
- If I click Assets and Compliance in the Workspace, and click Overview in the Navigation Pane Notice that everything that is in the Results Pane is reflected in the Navigation Pane.
In the Results Pane, I have Users, Devices, User Collections, Device Collection and so on. So, if I click Users in the Results Pane, I get the same results when I click Users in the Navigation Pane.
The other sections of the console are as follows
- The Ribbon at the Top is the set of actions or tasks for the selected navigation pane.
- For Example - Let’s say I need to Remote into one of my client computers to fix a problem. Click Assts and Compliance, in the Workspace, Devices in the Navigation Pane – Click SAWS01
If I click Start, in the Ribbon, I can choose remote control into SAWS01.
From the Ribbon, at the top, If I click the arrow I can minimize or maximize the Ribbon
- The Search Bar – This box allows you to enter text for filtering. For example, If I click Assets and Compliance in the Workspace then click users in the Navigation Pane, I can type SQL Admins in the Search Box. Displayed is the SQL Admins group
- The List View – This is the top portion of the Results Pane that displays items based upon the node that is selected in the Navigation Pane
- The Details Pane – This is the bottom portion of the results pane, and when it appears it displays additional details about the object selected in the list view
- Here are all the panes and views on one slide.

I will not be reviewing those items that have been discussed in previous lectures. In the PDF for this lecture those items are highlighted in yellow.
Asset and Compliance
This workspace is used to manage your assets like Users, Devices, User or Device collections, Software Metering, Compliance settings, Endpoint Protection Policies, and All Corporate-owned devices.
- Users – Here you manage users and groups in the hierarchy
- User and device collections – Collections are a group of users or devices. With collections you can deploy software or software updates to those collections
- User State Migration – This tool searches a system for all user data and settings and packages that data into an archive file so you can move this file onto another system.
- Software Metering – (Asset Management)
- Endpoint Protection – (Client Management Part 2)
- Asset Intelligence – (Asset Management)
- Compliance Settings – (Client Management part 2)
- All Corporate-Owned devices – This tool is used for identifying and securing corporate-owned devices. Click Predefined Devices, Rt click, in the open space, click Create Predeclared Devices, Here, you can upload a whole list of devices. You can use the IMEI (International Mobile equipment identity) or the serial number of the device as a CSV (Comma Separated Value) like an Excel file. To identify mobile devices in your organization.

Server Academy Members Only
Sorry, this lesson is only available to Server Academy Full Access members. Become a Full-Access Member now and you’ll get instant access to all of our courses.


