Deploying CMTrace to a Device Collection

Full-Access Members Only
Sorry, this lesson is only available to Server Academy Full-Access members. Become a Full-Access member now and get instant access to this and many more premium courses. Click the button below and get instant access now.
Instructions
Q&A (0)
Notes (0)
Resources (0)

Saving Progress...
Resources
There are no resources for this lesson.
Notes can be saved and accessed anywhere in the course. They also double as bookmarks so you can quickly review important lesson material.
So why bother deploying CMTrace to all your clients?
By default, CMTrace is not installed as part of the SCCM client installation. If you need to troubleshoot problems on the local client having CMTrace available can be a real-time saver. One method to remedy this problem is to create an application deployment that automatically copies CMTrace to a device collection of your choice. This will copy CMTrace.exe to any device that has the SCCM client installed.
Another method is to copy CMTrace using a task sequence. I have provided documentation if you would like to try this method as well. (Copy CMTrace to all computers using a task sequence.)
In this lecture, we will demonstrate the first method, by completing the following steps.
- Create the folder structure
- Use notepad to create a script
- Create an application in Configuration Manager
- Deploy CMTrace to a device collection
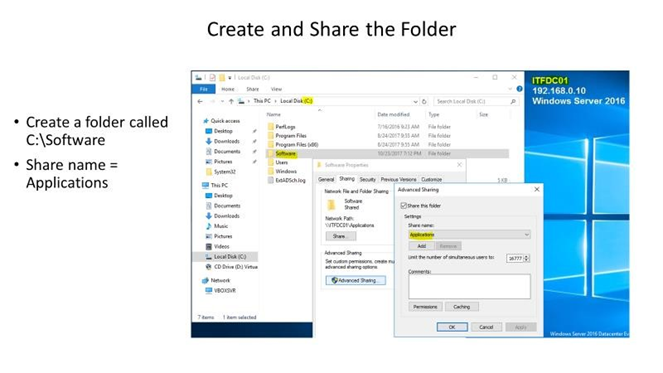
Step 1 Create the Folder

- From the ITFDC01 server
- Create a folder on the C: drive called C:\Software
- Share the folder and name the share -Applications

- Open Notepad, now let’s create the script • Type xcopy /y cmtrace.exe %windir%
- Now save the file.
- Click file, Save AS
- Make sure you change Save as Type FROM Text Documents, to ALL FILES
- Name the file - CopyCMTrace.cmd
- Save the file to the C:\Software folder.
- Step 2 Creating the Application
- From Configuration Manager, from the workspace open software library, from the Navigation Pane, double click Application Management, then right click Applications, select create Application.
- From the General tab – Select manually specify the application information, click next
- From General information – Type a name – CMTrace.
Select Allow this application to be installed from the Install Application Task Sequence action without being deployed, click next. - From the Application Catalog, click next
- From the Deployment Types, click Add
- From the Create Deployment Type Wizard, choose Manually specify the deployment type information, click next.
- From General Information tab, type the name Cmtrace, then click next.
- From the Content tab, enter the content location of the CMTrace.exe file which in this case is \\itfsccm01\sms_itf\tools, click browse
- From Installation Program box: type CopyCMTrace.cmd, then click next
- From the Detection Method tab, click Add Clause
- From the Detection Rule tab, in the path: field enter %windir%
From File or folder name: type cmtrace.exe, click ok, then next - From User Experience, change installation behavior to Install for System
- Change the Logon requirement to Whether or not a user is logged on, click next 3x.
- From the Summary review your settings, then click next, click close, then click next. After the application has been created, click close.
- Step 3 Deploying the Application to a device Collection
- From the list view, click the application that you have just created, in this case click
- CMTrace,
From the Ribbon click Deploy - From Collection , click Browse
- From Select Collection change user collection to device collection
- Select the Chicago OU, then click OK, click next.
- From Content, click the down arrow next to Add, select Distribution Point
- From Add Distribution Points click ITFSCCM01 as our distribution point, click ok, click next.
- From the Deployment Settings, Change Purpose from available to required, so that cmtrace is deployed automatically across all devices in the device collection. Click next 5x, then click close.
- From the workspace click Assets and Compliance, from the navigation pane, click Device Collections
- From the list view, double click on the Chicago OU device collection
- Here we see that ITFWS03 and 04 are the computers in the Chicago OU collection.
- Depending on the size of the collection, in a few minutes, CMTrace should be deployed to these two computers in the Chicago OU collection.
- Step 4 Verifying the Installation
- For verification open the software center on both machines.
- Here we see CMTrace has been deployed to the ITFWS03 computer
- Now let’s switch over to ITFSW04, bring up the software Center and we see that CMTrace has been deployed to this computer as well.
Congratulations you have completed this lecture, thanks for watching and we will see you in the next lecture.

Server Academy Members Only
Sorry, this lesson is only available to Server Academy Full Access members. Become a Full-Access Member now and you’ll get instant access to all of our courses.
- I am confused and can’t get this to work. I don’t understand this step From Installation Program box: type CopyCMTrace.cmd, then click next from step 2 of transcription. what I don’t understand is how does this know where to find the copycmtrace.cmd, is there a configuration that specifies that it is from a certain folder that I missed since we saved the command in the Applications share.


