Stub Zone Creation

Full-Access Members Only
Sorry, this lesson is only available to Server Academy Full-Access members. Become a Full-Access member now and get instant access to this and many more premium courses. Click the button below and get instant access now.
Instructions
Q&A (0)
Notes (0)
Resources (0)

Saving Progress...
Resources
There are no resources for this lesson.
Notes can be saved and accessed anywhere in the course. They also double as bookmarks so you can quickly review important lesson material.
In this Video:
- We will describe Stub Zones
- We will consider the differences between a conditional forwarder, a delegation and a stub zone.
- We will describe a scenario in which stub zones could be used in your organization.
- At the completion of this lecture, you will know how to use stub zones in your lab or your organization.
What is a Stub Zone? How are stub zones different from conditional forwarders or delegations?
Describe a Stub Zone
- A stub zone is a pointer, that points to another DNS server (we will call this server the target server).
- A stub zone is unique in that it can dynamically update itself.
- If things change (at the target domain) if DNS servers are added removed. Stub Zones know about those changes where delegations or conditional forwarders would have to be manually changed.
- A stub zone is a forward lookup zone. A stub zone only requires the SOA and the NS records from the other DNS server (or the target), which are normally publicly available.
- Stub zones are useful in that they are dynamically configured and basically can take care of themselves.
Describe Conditional Forwarders and Delegations
- Delegations and conditional forwarder are configured to point to other servers as well.
- When a conditional forwarder or a delegation is configured, a single server is used to resolve names. If that server (the target) goes down the clients won’t be able to get to the data that they require.
- Delegations and conditional forwarders are useful if there are no future changes made at the target domain.
LAB Prerequisites:

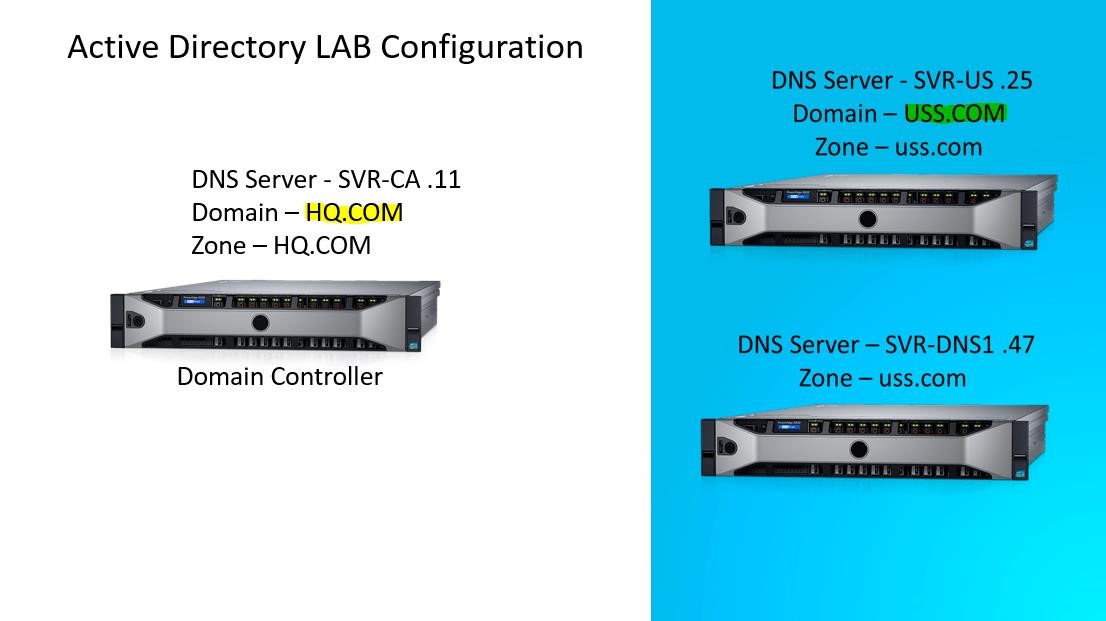
- Setup Three Windows 2016 Servers
- Two of those servers should be “stand alone” domains (completely separated) I used hq.com and uss.com.
- For the domain uss.com install Active Directory on SVR-US, On SVR-DNS1 install DNS. This server could be a member server.
- Setup one server in the hq.com domain, this server has Active Directory installed.
Scenario:
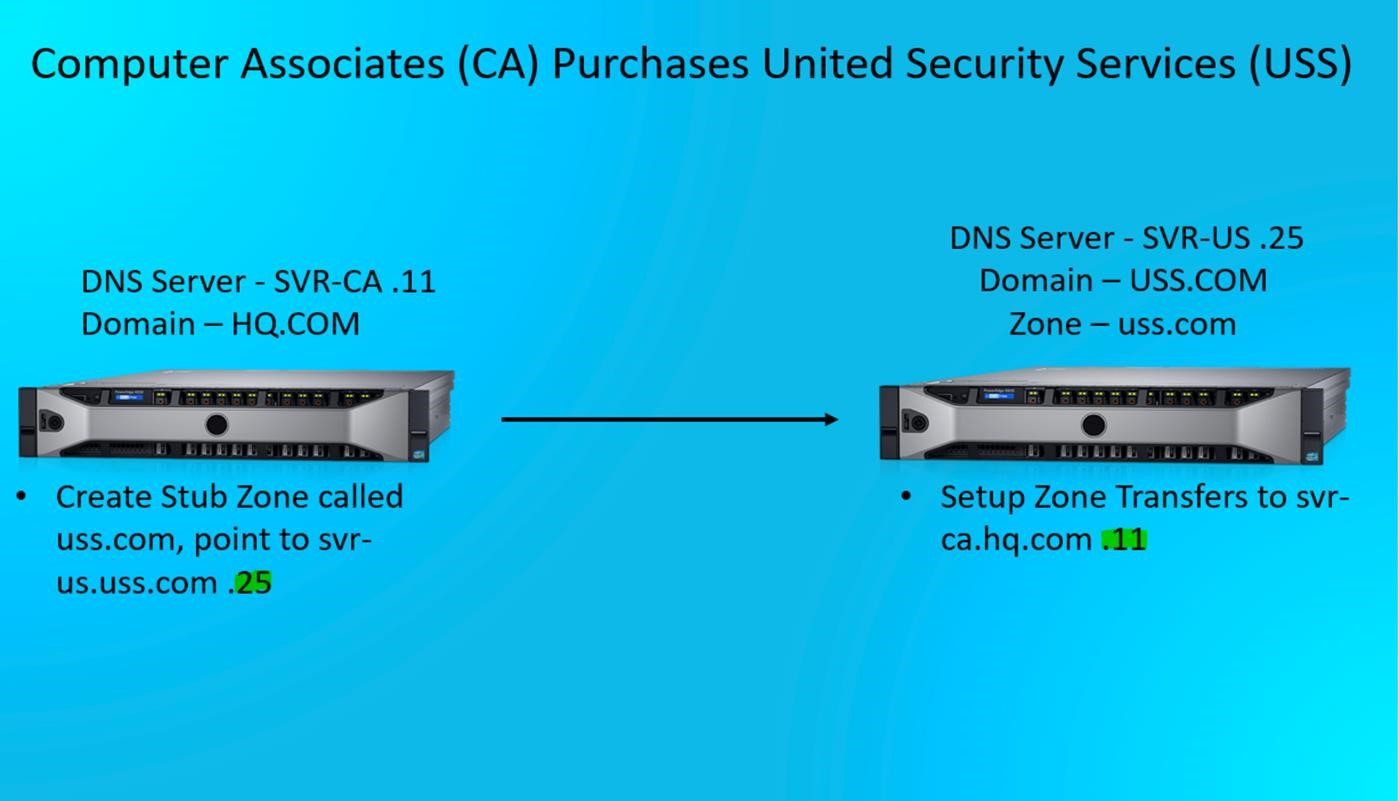
Your company, Computer Associates has just purchased United Security Services.
Both companies have completely separate Domains. The Managers at HQ need access to servers in the uss.com domain. You are the DNS administrator.
How will you configure DNS to satisfy the following requirements from management?
- Management will need access to certain files in the uss.com domain
- Management request fault tolerance, so that if one DNS server goes down they will not lose access to the files that they require.

Step 1
From the server SVR-CA, open a command prompt and type ping svr-us.uss.com. Ping cannot find the server. This proves that there is no access to SVR-US.
Step 2 Stub Zone Creation
From SVR-CA (we will call this the source), open server manager, tools, DNS. Double click the forward lookup zone, the current zones are displayed.
Right click forward lookup, select new zone, click next, Select Stub Zone, check store in Active Directory, click next.
Select how you want zone data replicated, in this case I select to all DNS servers running on Domain Controllers in this domain, click next.
For zone name type uss.com, click next. Type the IP address of the server that the stub zone will point too (or the target) in this case type the IP address for SVR-US which is 192.168.0.25. Click in the box. SVR-US is validated, click next, click finish Double click on the zone uss.com – Why would you receive this error Zone Not Loaded by DNS Server?
It is because Zone transfers have not been enabled on the uss.com zone.
Step 3 – Enable zone transfers
From SVR-US server (we will call this the target), open server manager, tools, DNS. Double click forward lookup zone, right click uss.com, select properties, click zone transfers, check allow zone transfers, select only to the following servers, click edit, type in the IP address of the server that you wish to send zone data too.

Server Academy Members Only
Sorry, this lesson is only available to Server Academy Full Access members. Become a Full-Access Member now and you’ll get instant access to all of our courses.


I’m attempting to go through the DNS module. Currently on the ‘Stub Zone Creation’ video, but can only view the video in 240p, which makes much of the content barely legible… Any idea why, or can this be improved? Changing the quality to ‘Auto’, makes no difference. I’m getting 200+ Mbps down, so I’m presuming the issue isn’t on my end.
Here’s a better example of what I’m seeing (or cannot see).
Hello Marcus Allen,
Thank you for bringing this to our attention. We sincerely apologize for the blurry quality of some of the videos. Your learning experience is our top priority, and we’re actively working to improve the video quality for a better experience. Paul is aware of this and will fix it soon.
I appreciate your understanding!
-Ricardo