
This 2024 version of our Linux for Beginners video was created to help you become comfortable working with a Linux distribution, and especially using or navigating around the Linux command line interface or CLI. In this video, I am going to show you how to setup your PC for virtualization,…

27 July, 2024 - 18 min read

Table of Contents
Related Courses


This 2024 version of our Linux for Beginners video was created to help you become comfortable working with a Linux distribution, and especially using or navigating around the Linux command line interface or CLI.
In this video, I am going to show you how to setup your PC for virtualization, install VirtualBox, download and install Ubuntu Server 24.04, and the basics of using a Linux distribution. This video is geared towards those who want to work in the IT field, so we will be using a CLI only OS, Ubuntu Server.
This video is based on our free course, Linux Fundamentals which is available for free (of course) at ServerAcademy.com. If you want to learn in a more structured format with a curriculum, quizzes and labs that run in your browser, then create a free account at ServerAcademy.com/signup-free.
Computer Virtualization Compatibility
Before diving into the hands-on portion of the course, it’s important to ensure your computer is compatible with the tools and software we’ll be using. For this course, we will be working with virtualization software and a Linux distribution, which may require certain hardware and software specifications.
- Hardware Requirements:
- Processor: A modern multi-core processor (Intel or AMD) with virtualization support (VT-x or AMD-V).
- RAM: At least 4GB of RAM is recommended, with 8GB or more being ideal to run VirtualBox and Ubuntu Server smoothly.
- Storage: A minimum of 20GB of free disk space. It’s preferable to have an SSD for faster read/write speeds.
- Software Requirements:
- Operating System: This course is designed for users with a Windows, macOS, or Linux operating system. However, Windows and macOS users may find it easier to follow along.
- Virtualization Software: We will be using Oracle VM VirtualBox, which is free and available for all major operating systems.
- Additional Considerations:
- BIOS/UEFI Settings: Ensure that virtualization is enabled in your BIOS/UEFI settings. This is crucial for running virtual machines.
Note that if you do not have a computer that can meet these requirements, then you can sign up to ServerAcademy.com and get access to our labs that run in your web browser.
Downloading VirtualBox
The first thing you need to do is choose the hypervisor software you want to run your Linux virtual machine. There are several options available to you, Hyper-V, VMWare Workstation Player, and VirtualBox, just to name a few. We are going to use VirtualBox because of it’s ease of use and host operating system support.
To download VirtualBox, go to https://www.virtualbox.org/wiki/Downloads, and download the latest version for your operating system. Then proceed to install VirtualBox with the default options.
Download a Linux Distribution
Next, you should download a Linux Distribution. You can use any you want, but just know that there may be slight differences if you chose a different OS than what we will use, which is Ubuntu Server.
The ISO for Ubuntu Server can be downloaded here: https://ubuntu.com/download/server.
Create a VirtualBox Virtual Machine (VM)
Now that we have all of our software downloaded, we can create our VirtualBox VM. This is as simple as opening VirtualBox, clicking Machine > Add. Configure your VM with the following settings:
- Name: Ubuntu Server
- ISO Image: [Select the ISO downloaded in the previous step]
- Skip Unattended Installation: Check this checkbox
- Base Memory: At least 2048MB of RAM
- Performance: At least 2 CPUs
- Hard Disk File Size: 80GB
Once you have created the VM, right-click it and select Properties. Go to the Network tab and change the Attached to: to be Bridged Adapter. Click OK to apply the settings.
Install Ubuntu Server
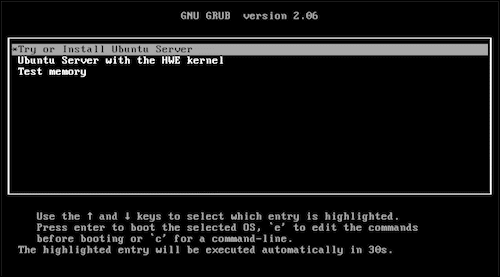
Start the newly created VM, and select Try or Install Ubuntu Server from the boot menu. For the installation, you will want to just use the default settings.
Under the Profile setup screen, you’ll want to configure the server name to be ubuntu-server, and then create a username and a password that you will use to log in to the server.
Once the install is complete, Ubuntu will reboot and sometimes there will be an error message about the VM failing unmount /cdrom, just press enter to continue.
The VM should then boot and you will be at the login screen. Log in with your credentials.
SSHing into your Linux Server
I strongly prefer to SSH into my Linux servers instead of using the VirtualBox console. It’s easier to read and allows for things like copy / pasting values directly to and from the CLI.
Open Command Prompt and type in ssh and press Enter. And if you get an output like this, then you already have SSH installed.

Third-Party SSH Clients:
If you prefer a graphical user interface, you can use third-party SSH clients like PuTTY or WinSCP.
PuTTY is a popular choice for SSH on Windows. Download and install it from the official website: PuTTY Download Page.
Open PuTTY, enter the remote server’s IP address or hostname, set the connection type to “SSH,” and click “Open.”
SSH from your Host Computer to Ubuntu Server
Find your Ubuntu Server IP address. Your IP address is gonna be different, and you can get that by typing in ip addr on Ubuntu. So again, I’m seeing 192.168.1.162.
You can connect to your VM using a command as shown below:
ssh username@ipaddress
In my example, my username is paulh, and my host is 192.168.1.162, so I will replace those values with the following:
You will see a message about the authenticity of the target host. This is normal for new hosts that you have not connected to before. Type yes, because this is our Ubuntu Server and press enter.

So if I press Enter, I’m presented with the same login banner, but you’ll notice I have some nice features here. First, I have the bigger text, which is nice for you guys to be able to read, and I have the full screen that I’m able to take advantage of, whereas in VirtualBox, I just have this little tiny screen.

All right, so now we’re logged into this computer so we can run the same kind of commands that we would before.
Linux CLI Basics
What is the Command Line Interface (CLI)?
The Command Line Interface, often referred to as the CLI or terminal, is a text-based interface for interacting with a computer’s operating system. It allows users to issue commands to the computer by typing text-based instructions rather than using a graphical user interface (GUI). The CLI is a powerful and efficient way to control and manage a Unix/Linux system.
Advantages of Using the CLI
Why would you want to use the CLI when you have a graphical desktop environment available? Here are some advantages:
- Efficiency: The CLI is often faster for experienced users to perform tasks.
- Scripting and Automation: You can create scripts to automate repetitive tasks.
- Resource Efficiency: The CLI consumes fewer system resources than a GUI.
- Remote Access: You can access and manage remote servers over a network.
Command Line
When you first enter the shell session you will see output like the following:
paulh@ubuntu-server:~$
Let’s break it down:
- paulh: This is the username of the current user who is logged into the system.
- @: This symbol separates the username from the hostname.
- ubuntu-server: This is the hostname of the computer or server. In this example, the system is named “ubuntu-server.”
- ~: The tilde character represents the current user’s home directory. In Unix/Linux systems, the tilde (~) is a shorthand notation for the home directory of the currently logged-in user. In this case, it indicates that the user “paulh” is in their home directory.
- $: The dollar sign ($) is the command prompt symbol. It signifies that the command line is ready to accept input from the user. You can enter commands after the prompt to interact with the system.
Linux Commands You MUST Know
Here is a table of Linux commands you must know if you’re working with Linux. This list could easily be 100 commands you must know, but you probably wouldn’t remember them so unfortunately we will stick with just a few:
| Command | Description | Example |
| ls | Lists directory contents | ls -l /etc |
| cd | Changes the current directory | cd /var/log |
| cp | Copies files and directories | cp /etc/passwd /tmp/passwd.bak |
| mv | Moves or renames files and directories | mv /tmp/file.txt /home/user/file.txt |
| rm | Removes files or directories | rm -rf /tmp/testdir |
| chmod | Changes file permissions | chmod 755 script.sh |
| chown | Changes file owner and group | chown user:group file.txt |
| ps | Displays currently running processes | ps aux |
| top | Displays real-time system resource usage | top |
| grep | Searches text using patterns | grep ‘error’ /var/log/syslog |
| sudo | Runs command as privileged user | sudo apt install nginx |
| nano | Edit any text based files | nano file.txt |
Introduction to the Linux File System Hierarchy
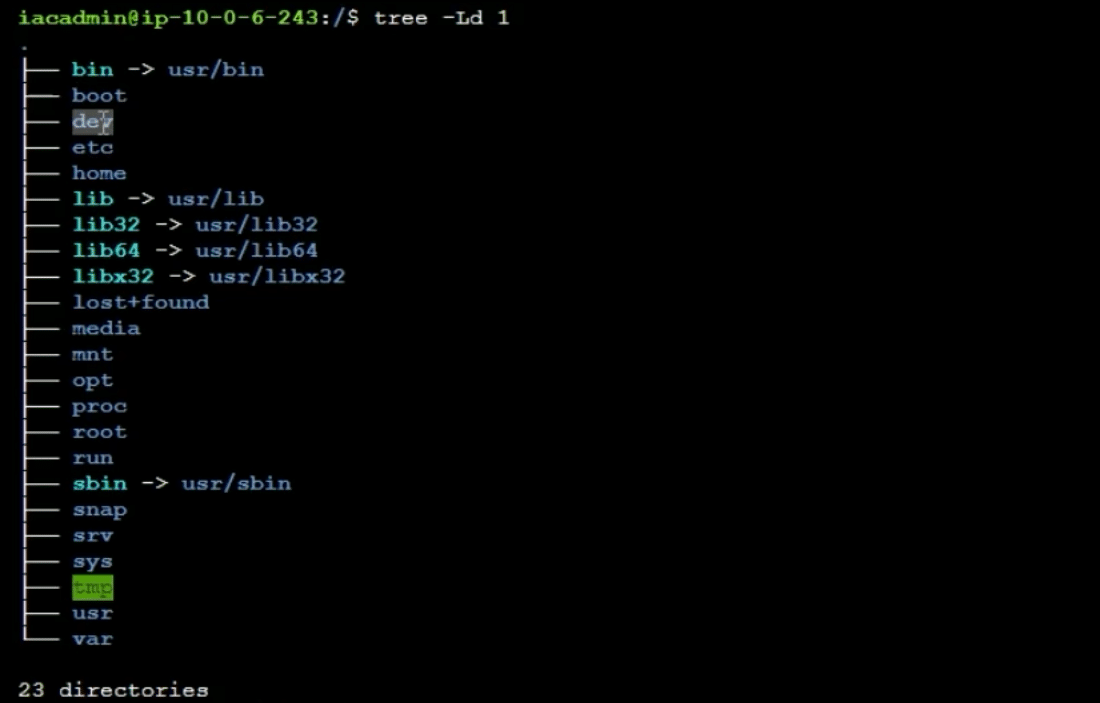
The Linux filesystem is structured in a hierarchical manner, starting from the root directory /. Unlike Windows, which uses drive letters like C:\ to represent different storage devices, Linux organizes everything under a single directory tree.
This unified structure efficiently manages different types of data and system resources, with each directory serving a specific purpose. Whether it’s system files, user data, or application resources, everything is neatly categorized and accessible from the root. Here’s a look at some of the most critical directories in the Linux filesystem.
/ (Root Directory)
The root directory, or just /, is the cornerstone of the Linux filesystem. It’s the very top of the directory structure where everything begins. All other directories and files are nestled under this main directory. It’s crucial because it serves as the gateway to all system and user data. When you’re navigating the file system, you’ll always start from /.
/bin
Now, the /bin directory is where you’ll find all the essential binaries or executable programs that the system needs to run, even in a minimal environment. Think of commands like ls, cp, and mv – they all live here. These are fundamental tools that every admin will use daily, making /bin indispensable for system operations.
/etc
The /etc directory is your go-to for system-wide configuration files. Whether you’re setting up networking, adjusting user settings, or configuring services, this is where you’ll find the necessary files. It’s a critical directory because it houses the configuration files that dictate how your system and services behave. If you need to change how something works, chances are you’ll be editing a file in /etc.
/home
Every user on a Linux system has a personal space in the /home directory. For example, if your username is paul, your personal files and configurations will be stored in /home/paul. This separation is important because it keeps user data distinct from system data, ensuring that users have their own space without interfering with system files. It’s where users store their personal files, configurations, and data.
/var
The /var directory is all about variable data – data that changes frequently. This includes system logs, spool files, and other data that grows over time. For instance, /var/log is where log files are stored, making it a key location for monitoring system activities and troubleshooting. It’s crucial for keeping track of what’s happening on your system and managing data that isn’t static.
File Ownership
In Linux, file ownership is a critical aspect of system security and management. Every file and directory in the system has an owner and a group associated with it. The owner typically has full control over the file, while the group can have specific permissions based on how the owner sets them. This structure allows for precise control over who can read, write, or execute a file, ensuring that sensitive data is protected and only authorized users can make changes.
File ownership is particularly important for maintaining system integrity and security. By assigning proper ownership, system administrators can prevent unauthorized access and modifications, which is crucial in multi-user environments where many users may have different levels of access to various system resources.
Example: Changing File Ownership
Let’s say we have a text file named example.txt owned by the root user. To see the current ownership and permissions, we use the ls -l command:
$ ls -l example.txt
-rw-r--r-- 1 root root 0 Jul 25 10:00 example.txt
In this example, root is both the owner and the group associated with the file. Now, if we want to transfer ownership of example.txt to a user named iacadmin, we use the chown command:
sudo chown iacadmin:iacadmin example.txtHere, iacadmin:iacadmin specifies the new owner and group. To confirm the change, we can list the file details again:
$ ls -l example.txt
-rw-r--r-- 1 iacadmin iacadmin 0 Jul 25 10:00 example.txt
Now, the example.txt file is owned by iacadmin, and the group is also iacadmin. This change ensures that the iacadmin user has control over the file, while others have restricted access based on the file’s permissions. Properly managing file ownership is crucial for maintaining system security and ensuring that users can only access and modify files they are authorized to handle.
Conclusion
This wraps up our Linux for Beginners tutorial for 2024. There is MUCH more you need to learn if you want to effectively administrate Linux systems! If you need to take your Linux skills farther than I recommend our Linux courses, one which is free and the next which is a full Linux Server Administration course.
This is our free Linux course that will get you started complete with an online IT lab:
Here is our full Linux Server Administration course which requires a full access membership to the site:
See you next time!